Descargar Ejemplo Ejemplo_DateTimePicker.zip
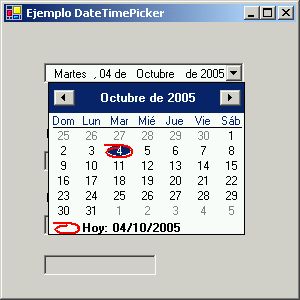
El control DateTimePicker permite seleccionar una fecha de manera conveniente. Cuando se accede a este objeto, muestra la fecha actual y, mediante flechas de desplazamiento que pertenecen al control, muestra calendarios que pueden recorrerse mes a mes y año a año.
Efectuando un clic sobre un número de día, el control se cierra, pudiéndose extraer este dato a través de la Propiedad Text o la Propiedad Value, para que se pueda utilizar a posteriori.
Asimismo, la Propiedad Value puede extenderse para extraer solo partes del dato obtenido, es decir, solo el número del día, el número del mes o el número del año, entre muchas otras
funcionalidades.
A continuación se muestra un ejemplo sencillo
en VisualBasic .NET que muestra un Formulario (Form1) que contiene:
– un control DateTimePicker (DateTimePicker1)
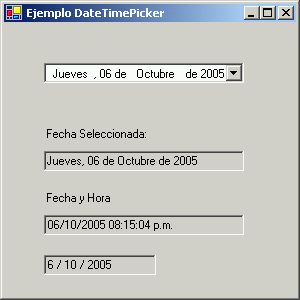
– un control TextBox (TextBox1) : muestra la fecha seleccionada en formato por
defecto *
– un control TextBox (TextBox2) : muestra la fecha seleccionada en formato
dd/mm/aa (día mes año) y la hora actual *
– un control TextBox (TextBox3) : muestra la fecha seleccionada en valores
individuales concatenados en formato dd/mm/aa (día mes año)
Mediante DateTimePicker1_ValueChanged podemos acceder al valor seleccionado.
* IMPORTANTE: Tengamos en cuenta, que la forma en que aparecen estos datos depende de cómo esten configuradas las distintas Opciones de Configuración Regional en el Panel de Control de Windows, siempre que no hayamos configurado programáticamente alguno de esos aspectos: Separador de Fecha, Formato de Fecha Corto y Formato de Fecha Largo. Dicho de otra manera: resulta conveniente obtener los valores de un Fecha (día y hora) en forma individual, mediante la Propiedad Value.xxxxxx y luego concatenarlos de manera conveniente, junto con los separadores adecuados, todo esto mediante código.
Inherits System.Windows.Forms.Form
#Region " Windows Form Designer generated code "
Public Sub New()
MyBase.New()
InitializeComponent()
End Sub
Protected Overloads Overrides Sub Dispose(ByVal disposing As Boolean)
If disposing Then
If Not (components Is Nothing) Then
components.Dispose()
End If
End If
MyBase.Dispose(disposing)
End Sub
Private components As System.ComponentModel.IContainer
Friend WithEvents DateTimePicker1 As System.Windows.Forms.DateTimePicker
Friend WithEvents TextBox1 As System.Windows.Forms.TextBox
Friend WithEvents Label1 As System.Windows.Forms.Label
Friend WithEvents Label2 As System.Windows.Forms.Label
Friend WithEvents TextBox2 As System.Windows.Forms.TextBox
Friend WithEvents TextBox3 As System.Windows.Forms.TextBox
<System.Diagnostics.DebuggerStepThrough()> Private Sub InitializeComponent()
Me.DateTimePicker1 = New System.Windows.Forms.DateTimePicker
Me.TextBox1 = New System.Windows.Forms.TextBox
Me.Label1 = New System.Windows.Forms.Label
Me.Label2 = New System.Windows.Forms.Label
Me.TextBox2 = New System.Windows.Forms.TextBox
Me.TextBox3 = New System.Windows.Forms.TextBox
Me.SuspendLayout()
‘
‘DateTimePicker1
‘
Me.DateTimePicker1.Location = New System.Drawing.Point(40, 40)
Me.DateTimePicker1.Name = "DateTimePicker1"
Me.DateTimePicker1.TabIndex = 0
‘
‘TextBox1
‘
Me.TextBox1.Location = New System.Drawing.Point(40, 128)
Me.TextBox1.Name = "TextBox1"
Me.TextBox1.ReadOnly = True
Me.TextBox1.Size = New System.Drawing.Size(200, 20)
Me.TextBox1.TabIndex = 1
Me.TextBox1.Text = ""
‘
‘Label1
‘
Me.Label1.Location = New System.Drawing.Point(40, 104)
Me.Label1.Name = "Label1"
Me.Label1.Size = New System.Drawing.Size(200, 16)
Me.Label1.TabIndex = 2
Me.Label1.Text = "Fecha Seleccionada:"
‘
‘Label2
‘
Me.Label2.Location = New System.Drawing.Point(40, 168)
Me.Label2.Name = "Label2"
Me.Label2.Size = New System.Drawing.Size(200, 16)
Me.Label2.TabIndex = 3
Me.Label2.Text = "Fecha y Hora"
‘
‘TextBox2
‘
Me.TextBox2.Location = New System.Drawing.Point(40, 192)
Me.TextBox2.Name = "TextBox2"
Me.TextBox2.ReadOnly = True
Me.TextBox2.Size = New System.Drawing.Size(200, 20)
Me.TextBox2.TabIndex = 4
Me.TextBox2.Text = ""
‘
‘TextBox3
‘
Me.TextBox3.Location = New System.Drawing.Point(40, 232)
Me.TextBox3.Name = "TextBox3"
Me.TextBox3.ReadOnly = True
Me.TextBox3.Size = New System.Drawing.Size(112, 20)
Me.TextBox3.TabIndex = 5
Me.TextBox3.Text = ""
‘
‘Form1
‘
Me.AutoScaleBaseSize = New System.Drawing.Size(5, 13)
Me.ClientSize = New System.Drawing.Size(292, 273)
Me.Controls.Add(Me.TextBox3)
Me.Controls.Add(Me.TextBox2)
Me.Controls.Add(Me.Label2)
Me.Controls.Add(Me.Label1)
Me.Controls.Add(Me.TextBox1)
Me.Controls.Add(Me.DateTimePicker1)
Me.Name = "Form1"
Me.Text = " Ejemplo DateTimePicker"
Me.ResumeLayout(False)
End Sub
#EndRegion
Priate Sub DateTimePicker1_ValueChanged(ByVal sender As System.Object, ByVal e As System.EventArgs) Handles DateTimePicker1.ValueChanged
‘Muestra la Fecha Seleccionada
TextBox1.Text = DateTimePicker1.Text
‘Muestra la Fecha y la Hora
TextBox2.Text = DateTimePicker1.Value.ToString()
‘Muestra solo la Fecha
TextBox3.Text = DateTimePicker1.Value.Day & " / " & DateTimePicker1.Value.Month & " / " & DateTimePicker1.Value.Year
End Sub
End Class
Apertura del DateTimePicker:
Se efectúa un clic sobre el número 6 (seis):
Descargar Ejemplo Ejemplo_DateTimePicker.zip
Con más de 20 años de experiencia en programación, experto en lenguajes .NET, VB, C#, ASP.NET, Xamarin, XCode, Flutter y DBA en SQL Server. Creador de dotnetcr.com, sitio web para programadores en español.


